Contact Us
--------------------------
800-496-4638 EXT4
413-743-7044 EXT4
Monday-Friday, 10am-4pm
support@bcn.net
Berkshire County Network |
Setting up your e-mail is a bit like setting up a new computer: You do it only once. After you configure your e-mail accounts in Windows Mail, you never have to hassle with it again—unless, of course, you open a new e-mail account.
Windows Mail allows you to send and receive messages from multiple e-mail accounts. You can set up Windows Mail to work with many types of providers, from the biggest, most popular e-mail services all the way down to the smallest Internet service provider (ISP).
Managing multiple e-mail accounts is simplified because each account in Windows Mail is organized in its own folder. You can check for messages from all your e-mail accounts at once by clicking a single button. But first, you'll need to set up each e-mail account one at a time in Windows Mail.
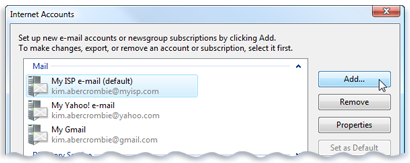
You can add multiple e-mail accounts in Windows Mail, and send and receive e-mail for all of them from one location
Don’t be confused
Before you set up Windows Mail, start by collecting the following information for each e-mail account. You will need to enter this information during the setup process:
-
Your e-mail address and password.
-
The type of e-mail server your e-mail service uses.
-
The address of the incoming and outgoing e-mail servers used by your e-mail provider.
Most people know their e-mail addresses and passwords, but many people get confused when asked to enter information about e-mail servers. This is easiest if you gather some basic information from your e-mail provider before you begin adding accounts in Windows Mail.
E-mail server types
Windows Mail supports three types of e-mail servers. You don’t need to understand the details about these server types; you just need to find out which one your e-mail service uses both for incoming and outgoing e-mail:
-
Post Office Protocol 3 (POP3) servers. Most e-mail services and ISPs use this type of server, especially for personal e-mail accounts. They hold incoming e-mail messages until you check your e-mail, at which point they're transferred to your computer. Messages are typically deleted from the server when you check your e-mail.
-
Internet Message Access Protocol (IMAP) servers. These servers let you work with e-mail messages without downloading them to your computer first. You can preview, delete, and organize messages directly on the e-mail server. Copies are stored on the server until you delete them. IMAP is commonly used for business e-mail accounts.
-
Simple Mail Transfer Protocol (SMTP) servers. This outgoing mail server handles the sending of your e-mail messages to the Internet. An SMTP server handles only the outgoing e-mail, and is used in conjunction with a POP3 or IMAP incoming e-mail server.
Incoming and outgoing e-mail servers

POP3 is by far the most common type of incoming e-mail server for personal e-mail accounts. And SMTP is the only type of outgoing e-mail server that works with Windows Mail, so you normally don’t even need to check the outgoing server type with your e-mail provider. Practically all personal e-mail accounts—with the exception of web-based e-mail—use an SMTP server for outgoing e-mail.
E-mail server addresses usually have the same format. Most ISPs (named “myisp” in this example) have server addresses like this:
-
Incoming server: pop.myisp.com (or imap.myisp.com, if they use an IMAP server)
-
Outgoing server: smtp.myisp.com
You can usually substitute the name of your ISP in place of myisp in the example above. If this doesn’t work, check with your ISP. Questions about e-mail server addresses are among the most common inquiries e-mail providers get, so they usually have this information posted in the support section of their websites.
Here are server addresses for some of the most popular e-mail services:
-
Yahoo!: pop.mail.yahoo.com (incoming) and smtp.mail.yahoo.com (outgoing)
-
AOL: imap.aol.com (incoming) and smtp.aol.com (outgoing)
-
Gmail: pop.gmail.com (incoming) and smtp.gmail.com (outgoing)
Finally, you must know whether your outgoing e-mail server requires authentication, since there is a check box for this when you set up a new e-mail account in Windows Mail. If you can’t find out the answer from your e-mail provider, try sending a test message with the check box selected and another one with the check box cleared, to see which works.
Note
Some e-mail services, such as Yahoo! Mail, require a premium subscription for POP3 access.
Web-based e-mail and Windows Live Mail
Many people want to know if they can send and receive Windows Live Hotmail in Windows Mail. The answer is no—Windows Mail does not support the HTTP servers used by Hotmail and other web-based e-mail services.
However, you can set up Hotmail and other web-based e-mail accounts to work with Windows Live Mail. This allows you to store and read Hotmail messages even when you are not connected to the Internet.
Windows Live Mail includes the familiar features of Windows Mail, the mail program included in Windows Vista, plus new features such as the ability to automatically enter the correct settings for e-mail servers used by popular e-mail services, including Windows Live Hotmail, Yahoo!, AOL, and Gmail.
Windows Live Mail also works with e-mail services from other e-mail providers and ISPs, although you will have to configure those accounts manually.
To download Windows Live Mail, go to the Windows Live Mail website.